# node
# Liunx安装node
# 注:记得开启端口
iptables -A INPUT -p tcp -m tcp --dport 3000 -j ACCEPT
# 配置完成,重启nginx
systemctl restart nginx
# 去node官网找下载链接 ( http://nodejs.cn/download/ )

# 找到相对应的安装包链接
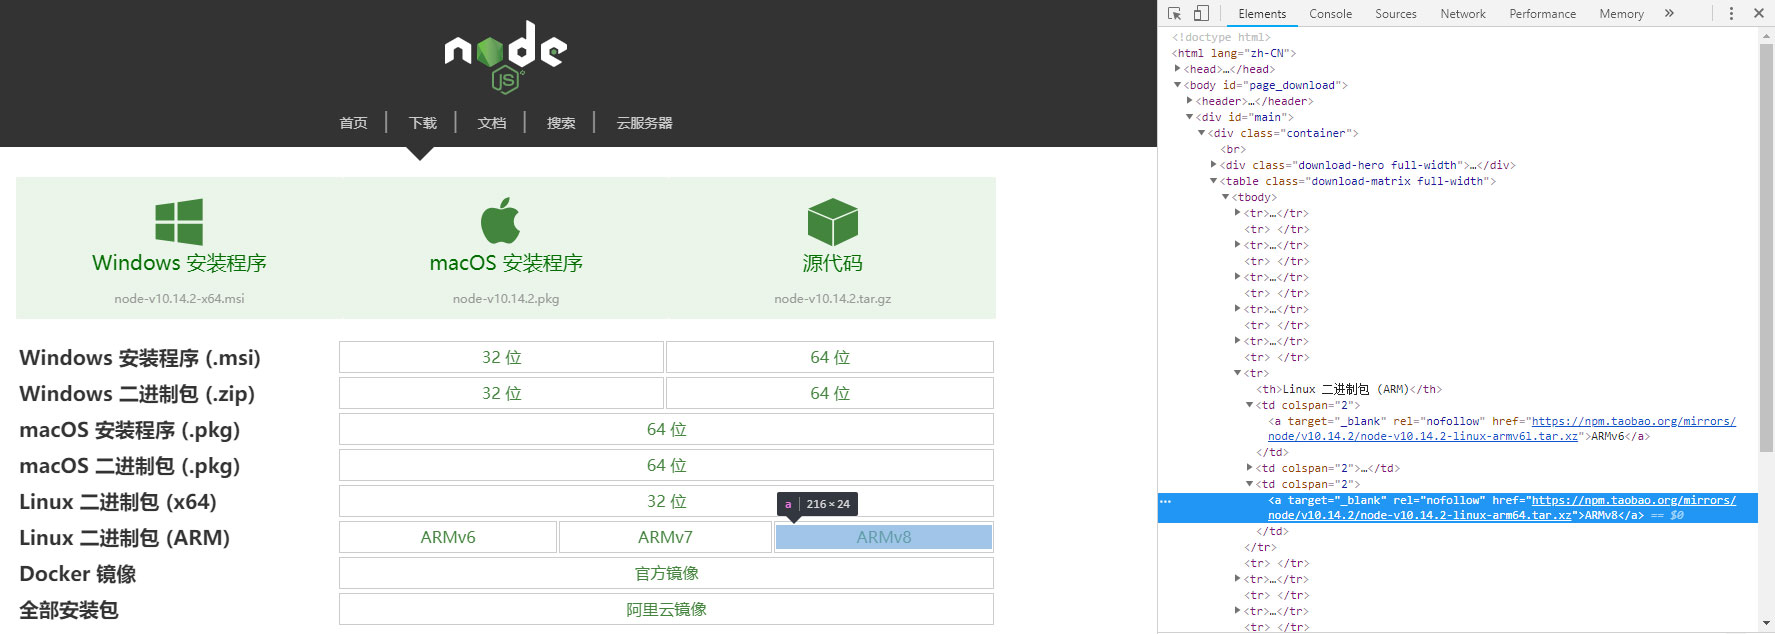
# 安装包链接如下:
https://npm.taobao.org/mirrors/node/v10.8.0/node-v10.8.0-linux-x64.tar.xz
# 服务器进入要下载的地址,并且下载、解压
进入要下载的目录
cd /usr/local/src
进入要下载的目录
wget https://npm.taobao.org/mirrors/node/v10.8.0/node-v10.8.0-linux-x64.tar.xz
因为是tar.xz格式所以要解压两次
xz –d node-v10.8.0-linux-x64.tar.xz
tar –xvf node-v10.8.0-linux-x64.tar
# Node 环境配置(这样可以使得在任何目录下,都可以使用/usr/local/src/ node-v8.9.3-linux-x64/bin 下得node命令)
修改 /etc/profile 文件 在最后面加
export NODE_HOME=/usr/local/src/node-v10.8.0-linux-x64
export PATH=$PATH:$NODE_HOME/bin
export NODE_PATH=$NODE_HOME/lib/node_modules
保存
:wq
使配置文件生效
source /etc/profile
查看效果
node –v
v10.8.0
# 使用json-server模拟REST API
在开发过程中,前后端不论是否分离,接口多半是滞后于页面开发的。所以建立一个REST风格的API接口,给前端页面提供虚拟的数据,是非常有必要的。 对比过多种mock工具后,我最终选择了使用 json server 作为工具,因为它足够简单,写少量数据,即可使用。 也因为它足够强大,支持CORS和JSONP跨域请求,支持GET, POST, PUT, PATCH 和 DELETE 方法,更提供了一系列的查询方法, 如limit,order等。下面我将详细介绍 json server 的使用。
# 全局安装json-server
cnpm install -g json-server
# 新建一个文件夹,并且npm init
mkdir jsonserver && cd jsonserver
npm init
# 安装json-server
cnpm install json-sever --save
# 设置npm启动
"scripts": {
   "json:server": "json-server --watch db.json"
}
# 新建一个db.json文件
{
	"users": [{
			"name": "Henry",
			"phone": "333-444-555",
			"email": "Henry@gmail.com",
			"id": 1,
			"age": 30,
			"companyId": 1
		},
		{
			"name": "kobe",
			"phone": "333-444-556",
			"email": "kobe@gmail.com",
			"id": 2,
			"age": 34,
			"companyId": 2
		},
		{
			"name": "james",
			"phone": "333-444-557",
			"email": "james@gmail.com",
			"id": 3,
			"age": 28,
			"companyId": 3
		},
		{
			"name": "wade",
			"phone": "333-444-558",
			"email": "wade@gmail.com",
			"id": 4,
			"age": 50,
			"companyId": 3
		}
	],
	"companies": [{
			"id": 1,
			"name": "Apple",
			"description": "Apple is good"
		},
		{
			"id": 2,
			"name": "Microsoft",
			"description": "Microsoft is good"
		},
		{
			"id": 3,
			"name": "Google",
			"description": "Google is good"
		}
	]
}
# 运行npm
npm run json:server
# 案例
http://localhost:3000/users?id=2
# node express获取微信的openid
# 安装express
#Express 应用程序生成器
npm install express-generator -g
#新建express 项目
express --view=pug myapp
#进入目录并且安装依赖
cd myapp & cnpm install
#启动
npm start
# 安装request模块
cnpm i request --save
# routes/index.js 路由文件修改
var express = require('express');
var router = express.Router();
var request = require('request');

//下面是微信测试号的账号信息
var AppID = 'wxe89cb7081ce1fc3b';
var AppSecret = 'e93c8c192bee2ca6ea0f54a37c4f7c47';

/* GET home page. */
router.get('/', function (req, res, next) {
  var router = 'get_wx_access_token';
  var return_uri = 'http://testwechat.com/' + router;
  var scope = 'snsapi_userinfo';
  res.redirect('https://open.weixin.qq.com/connect/oauth2/authorize?appid=' + AppID + '&redirect_uri=' + return_uri + '&response_type=code&scope=' + scope + '&state=STATE#wechat_redirect');
  //res.render('index', { title: 'Express' });
});

router.get('/get_wx_access_token', function (req, res, next) {
  var code = req.query.code;
  console.log(code)
  request.get(
    {
      url: 'https://api.weixin.qq.com/sns/oauth2/access_token?appid=' + AppID + '&secret=' + AppSecret + '&code=' + code + '&grant_type=authorization_code',
    }, function (error, response, body) {
      if (response.statusCode == 200) {

        // 第三步:拉取用户信息(需scope为 snsapi_userinfo)
        //console.log(JSON.parse(body));
        var data = JSON.parse(body);
        var access_token = data.access_token;
        var openid = data.openid;
        console.log(data);
        request.get(
          {
            url: 'https://api.weixin.qq.com/sns/userinfo?access_token=' + access_token + '&openid=' + openid + '&lang=zh_CN',
          }, function (error, response, body) {
            if (response.statusCode == 200) {
              var userinfo = JSON.parse(body);
              console.log(userinfo);
              // console.log(userinfo.nickname);
              // console.log(userinfo.headimgurl);
              // console.log(userinfo.city);
              // res.send("\
              //     <h1>"+userinfo.nickname+" 的个人信息</h1>\
              //     <p><img src='"+userinfo.headimgurl+"' /></p>\
              //     <p>"+userinfo.city+","+userinfo.province+","+userinfo.country+"</p>\
              // ");
              res.render('index', { userinfo: userinfo });
            }
          })
      }
    }
  )
});

module.exports = router;
# parcel打包
TIP
Parcel 是 Web 应用打包工具,适用于经验不同的开发者。它利用多核处理提供了极快的速度,并且不需要任何配置。 parcel官网
# 全局安装parcel
npm install -g parcel-bundler	// npm
yarn global add parcel-bundler	// yarn
在你正在使用的项目目录下创建一个 package.json 文件:
npm init -y
Parcel 可以使用任何类型的文件作为入口,但是最好还是使用 HTML 或 JavaScript 文件。如果在 HTML 中使用相对路径引入主要的 JavaScript 文件,Parcel 也将会对它进行处理将其替换为相对于输出文件的 URL 地址。
接下来,创建一个 index.html 和 index.js 文件。
<html>
  <body>
    <script src="./index.js"></script>
  </body>
</html>
console.log('hello world')
Parcel 内置了一个当你改变文件时能够自动重新构建应用的开发服务器,而且为了实现快速开发,该开发服务器支持热模块替换。只需要在入口文件指出:
parcel watch index.html
你也能使用createapp.dev在浏览器中创建一个 Parcel 项目。选择你需要的特性列如 React, Vue,Typescript 和 CSS,然后你将会看到项目实时生成。你能通过这个工具去学习如何怎么建立一个新的项目并且你也能下载这个项目作为一个 zip 文件然后立即开始写代码。
# 多个文件入口
假设你有超过一个的入口文件,比如是index.html and about.html,你有两种方式来打包:
指定当前文件的名字:
parcel index.html about.html
使用 tokens 并创建一个 glob:
parcel ./**/*.html
注意: 假设你的文件目录结构如下:
- folder-1
-- index.html
- folder-2
-- index.html
打开 http://localhost:1234/folder-1/ 是不行的,反而你需要显式地指向文件 http://localhost:1234/folder-1/index.html。
# 生产模式构建
当你准备在生产模式下创建,build 模式会关闭监听并且只建立一次。请查阅 Production 查看更多细节。
添加 parcel 到你的项目 有时全局安装 Parcel 是不可能的。举个例子,假如你正在构建其他人的 build agent 或者你想使用 CI 以编程的方式构建你的项目。如果这样,你可以将 Parcel 作为本地包安装并运行。
Yarn 方式安装:
yarn add parcel-bundler --dev
NPM 方式安装:
npm install parcel-bundler --save-dev
接着,通过修改你的package.json来添加这些任务脚本
{
  "scripts": {
    "dev": "parcel <your entry file>",
    "build": "parcel build <your entry file>"
  }
}
然后,你就能运行它了:
以开发模式运行
yarn dev
或
npm run dev
以生成模式运行
yarn build
或
npm run build
# parcel搭建react
第一步:创建一个npm项目,并且建npm默认文件
mkdir react-parcel
cd react-parcel
npm init -y
第二步:添加 React、Babel 和 Parcel 的依赖。
npm install --save react
npm install --save react-dom
npm install --save-dev babel-preset-react
npm install --save-dev babel-preset-env
npm install --save-dev parcel-bundler
npm install --save-dev @babel-core
第三步:创建 .babelrc 文件,这个文件告诉 Parcel 我们使用了 ES6 和 React JSX。
{
  "presets": ["env", "react"]
}
第四步:创建 React 项目,它仅仅包含两个文件。 index.js
import React from "react";
import ReactDOM from "react-dom";
class App extends React.Component {
	render() {
		return <div>halo</div>
	}
}
ReactDOM.render(<App />, document.getElementById('root'));
index.html
<!DOCTYPE html>
<html>
    <head>
        <title>React starter app</title>
    </head>
    <body>
        <div id="root"></div>
        <script src="./index.js"></script>
    </body>
</html>
第五步:在 package.json 中添加 script 脚本,用于启动我们的应用。
"scripts": {
  "start": "parcel index.html",
},
第六步:启动应用
npm start
确保你的 node 版本大于等于 8.0.0,之后可以在浏览器中输入 http://localhost:1234 看到应用的内容。